In a world where online shopping has become an integral part of our lives, staying ahead of the curve is paramount for e-commerce businesses. The digital realm continually evolves, offering new and innovative ways to engage customers and enhance their shopping experiences.
One such groundbreaking technology that’s revolutionizing the e-commerce landscape is 3D imagery, and it’s changing the way consumers interact with products online.
In this comprehensive guide, we’ll walk you through the process of embedding 3D images in WooCommerce, providing you with step-by-step instructions, valuable insights, and practical tips to make your online store truly stand out. Are you ready to explore the future of e-commerce?
Let’s embark on this transformative journey together.
We are going to use the popular 3D Viewer plugin. You can read this guide on why it is the best 3D Viewer plugin.
Why You Should Embed 3D Images in WooCommerce?
Today, consumers are no longer satisfied with flat, two-dimensional product images. They crave immersive and interactive experiences that closely resemble the tactile sensations of in-store shopping. This is where embedding 3D images in WooCommerce comes into play, offering a myriad of compelling reasons to make the switch.
Here are the reasons why you should Embed 3D Images in WooCommerce-
- Enhanced Product Visualization
- Improved Customer Engagement
- Reduced Returns
- Competitive Edge
- Cross-Sell and Upsell Opportunities
- Mobile Optimization
- SEO Benefits
- Innovative Brand Image
- Reduced Customer Queries
- Future-Proofing Your Business
Now let’s see how to embed 3D Images in WooCommerce.
Steps to Embed 3D Images in WooCommerce
You can follow these steps to embed 3D images in your WooCommerce store-
- Step 1: Install the 3D Viewer Plugin
- Step 2: Configure WooCommerce Settings in the 3d Viewer Plugin
- Step 3: Add 3D Models
- Step 4: Configure WooCommerce Models
Now lets see the steps in detail-
Step 1: Install the 3D Viewer Plugin
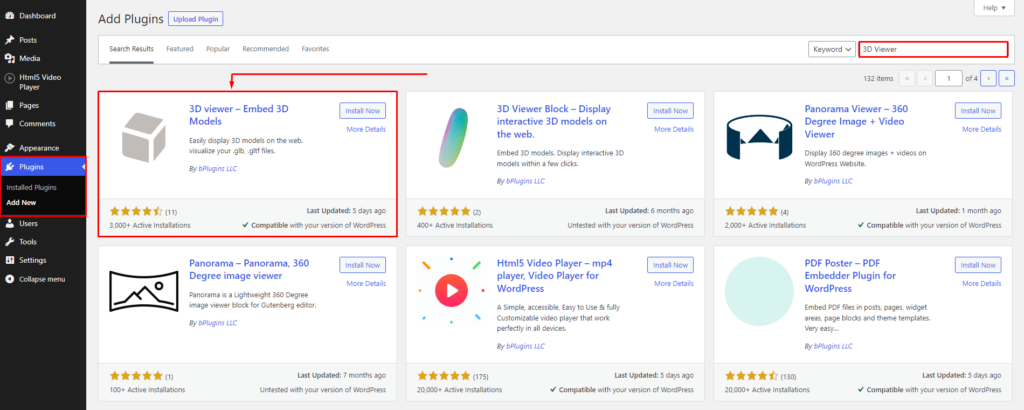
Here is how you can install the 3d viewer plugin-
- Login into your WordPress Admin area
- Click on the left-side Plugin menu
- Now, Go to the right side and search for the Plugin “3D Viewer”
- Click on the Install Now Button
- Once the Plugin is installed, click on Activate Button
Now, you can show in your Admin Panel, the new menu has been added called 3D Viewer
Step 2: Configure WooCommerce Settings in the 3d Viewer Plugin
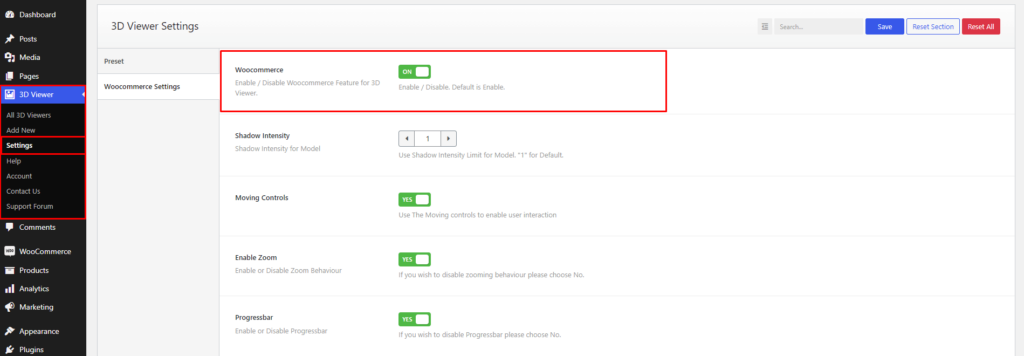
To show models in WooCommerce, enable Woocommerce options first from 3D Viewer > Settings > Woocommerce Settings.
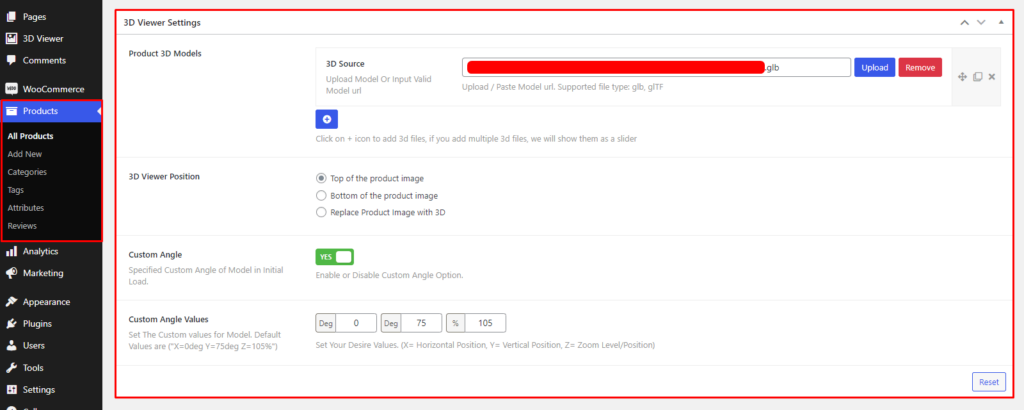
Step 3: Add 3D Models
After enabling, go to the product edit page, there will be a settings panel called 3D Viewer Settings.
From here, add one or more 3D models to show on the product page. Also, set the position of the models and the custom angle.
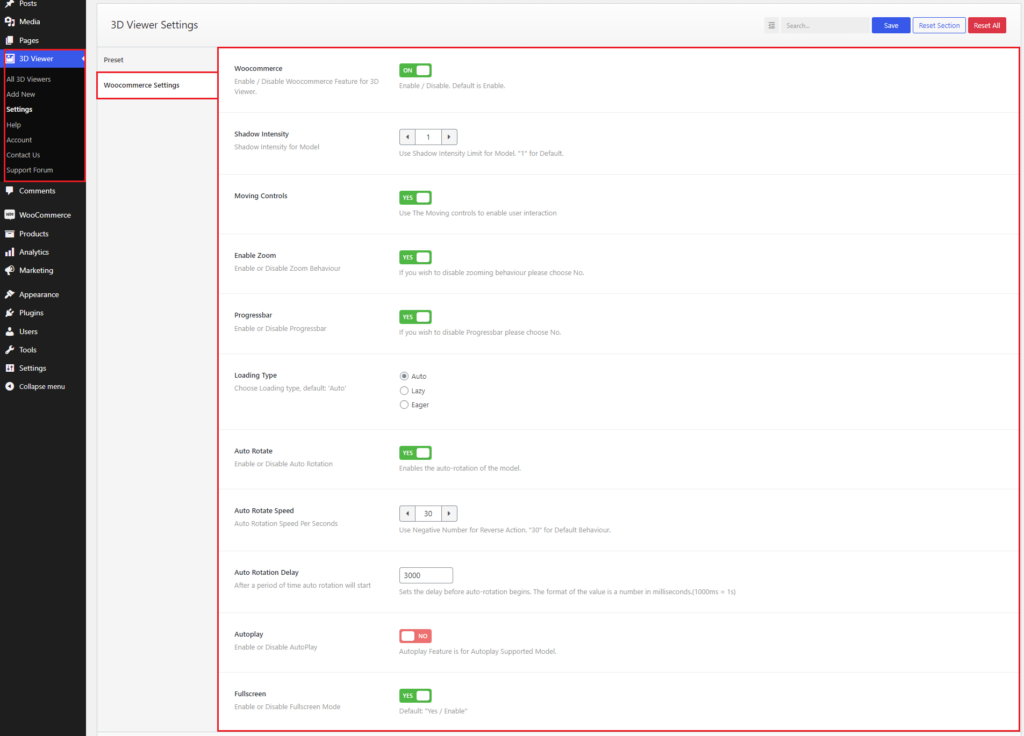
Step 4: Configure WooCommerce Models
For the configuration of WooCommerce models, again go to 3D Viewer > Settings > Woocommerce Settings.
You can also enable/disable Moving Controls, Zoom, Auto Rotate, Autoplay, set Shadow Intencity, Loading Type(Auto, Lazy, Eager), Auto Rotate Speed, Auto Rotate Delay, and show/hide Progressbar, Fullscreen Button from here.
You are done.
Bonus: Add WooCommerce Variants to Your 3d images
There are two steps to add different models for different variants of a product: Add Variant, and Set Model for Different Variant
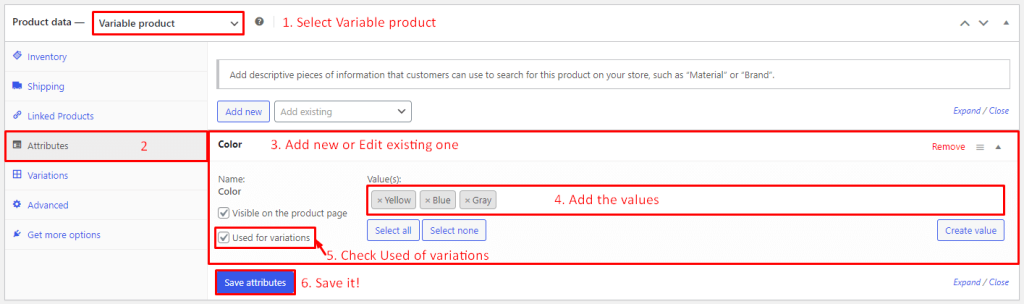
1. Add Variant
To add variants of a product,
- 1. Select the Variable product from the Product data.
- 2. Select Attributes.
- 3. Add new or edit existing attributes. Note: the first attribute will be the selected variant
- 4. Add attribute value.
- 5. Must check Used of variations option.
- 6. Finally, Save attributes.
After saving attributes, select Variations. Then click Generate Variations.
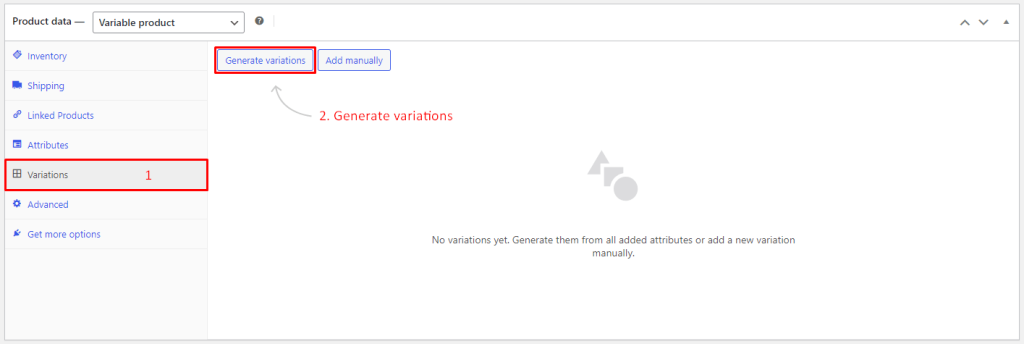
After clicking Generate Variations, you will see it will show the variations. You can edit the variation. Make sure the price for the variation is added.

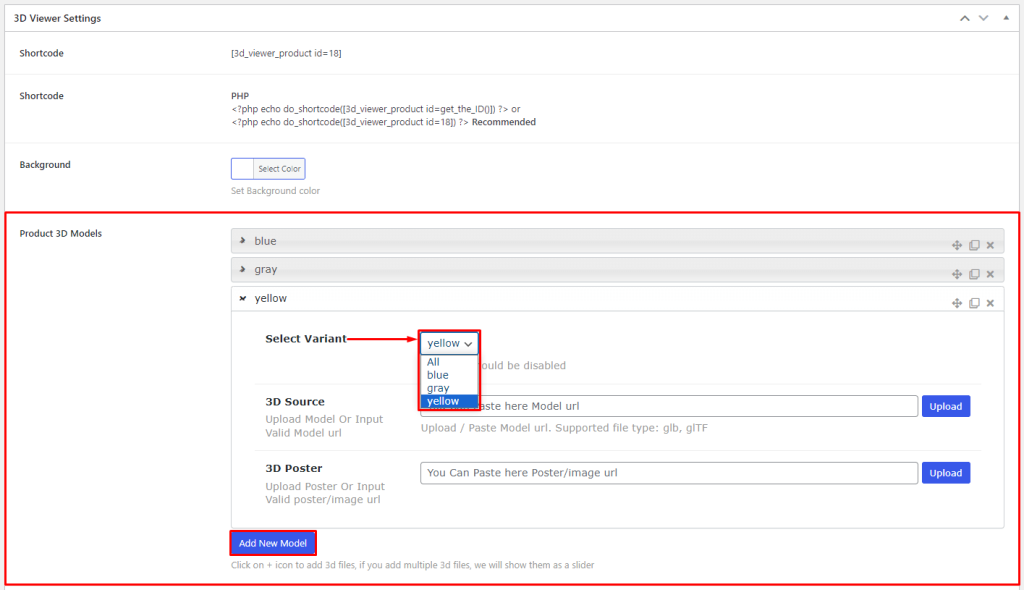
2. Set Model for Different Variant
After adding variations, go to 3D Viewer Settings. From this panel, click on Add New Model from the Product 3D Models option. You can see the option called Select Variant. Add different models from there.
This is how you can embed 3D images in WooCommerce.
Conclusion on How to Embed 3d Images in WooCommerce
Embracing 3D images isn’t merely a one-time endeavor; it’s a journey towards improving your customer experiences, increasing conversions, and future-proofing your e-commerce business. As the digital shopping landscape continues to evolve, those who invest in such forward-thinking technologies are the ones who will thrive in the competitive world of online retail.
So, take the leap into the future of e-commerce. Start embedding 3D images in your WooCommerce store today, and watch as your online business soars to new heights, offering customers an engaging, interactive, and memorable shopping experience that keeps them coming back for more.