Online radio has never been easier to launch. Whether you’re a DJ sharing live sets, a church streaming Sunday services, a podcaster hosting live shows, or a local station reaching a wider audience, live streaming lets you connect with listeners in real time—no FM tower needed.
Thanks to its flexibility and powerful plugin ecosystem, WordPress is an ideal platform for live radio streaming. With the right tools and a few simple steps, you can add a fully functional radio stream to your site—no coding or complex equipment required.
In this guide, you’ll learn how to set up a live radio stream in WordPress, from choosing a streaming server to embedding your player and optimizing for a great listening experience.
Let’s get started:
What You Need to Stream Live Radio on WordPress
To get your live radio stream up and running on WordPress, you’ll need a few key components working together.
Think of it as building a simple broadcasting chain: you send audio from your computer to a streaming server, which then delivers it to your WordPress website, where visitors can tune in using an embedded radio player.
Here’s a breakdown of the essential tools you’ll need:
1. A Streaming Server
A streaming server is where your audio is hosted and distributed to your listeners in real-time. It takes your live audio feed and makes it accessible online. Some of the most popular options include:
- Icecast (Free and open-source, widely supported)
- Shoutcast (Great for public and private stations, supports metadata)
- Radio.co (Managed, all-in-one solution with analytics and scheduling)
- Airtime (Web-based automation for DJs and community stations)
Each has its strengths. Icecast and Shoutcast are ideal for tech-savvy users or those with self-hosting needs. Radio.co and Airtime are better for those who prefer a user-friendly dashboard and built-in tools.
💡 Tip: Many streaming server providers offer embeddable players and integration guides for WordPress.
2. Live Broadcasting Software
This is the tool you’ll use to send your audio feed to the streaming server. Your microphone or music software feeds into this, and it pushes the content out in real-time.
Common tools include:
- BUTT (Broadcast Using This Tool) – Free and simple for beginners
- Mixxx – Advanced, with DJ features, virtual decks, and library support
- SAM Broadcaster – Professional-grade software with automation and scheduling
Your choice will depend on how much control and mixing capability you need. For a basic WordPress radio stream, BUTT is often more than enough.
3. A WordPress Website
Of course, you’ll need a WordPress site where listeners can find and tune in to your station. WordPress gives you full control over design, branding, content, and SEO, making it the perfect platform for hosting a radio station.
Whether you’re running a blog, a DJ page, a church livestream, or a full-fledged online station, WordPress gives you the flexibility to grow and customize your presence.
4. A Compatible Radio Player Plugin
To make your live radio stream playable on WordPress, you’ll need a front-end audio player that can connect to your streaming server and play the stream in real time. Plugins are the easiest and most reliable way to do this.
Some popular WordPress radio player plugins include:
- StreamCast – Lightweight, customizable, supports Icecast and Shoutcast
- WP Radio Player – Visual player with schedule and metadata support
- Radio Player by SoftLab – Focused on modern UI and fallback support
These plugins typically let you enter your stream URL, adjust the design, and embed the player via shortcode or block. Look for options that are mobile-friendly and support autoplay or metadata (like current track name).
Also read: 6 Best WordPress Audio Player Plugins: Ultimate Comparison
How to Add a Live Radio Stream in WordPress
In this section, you’ll learn how to add a live radio stream to your WordPress site using the StreamCast plugin.
Installation and Activation
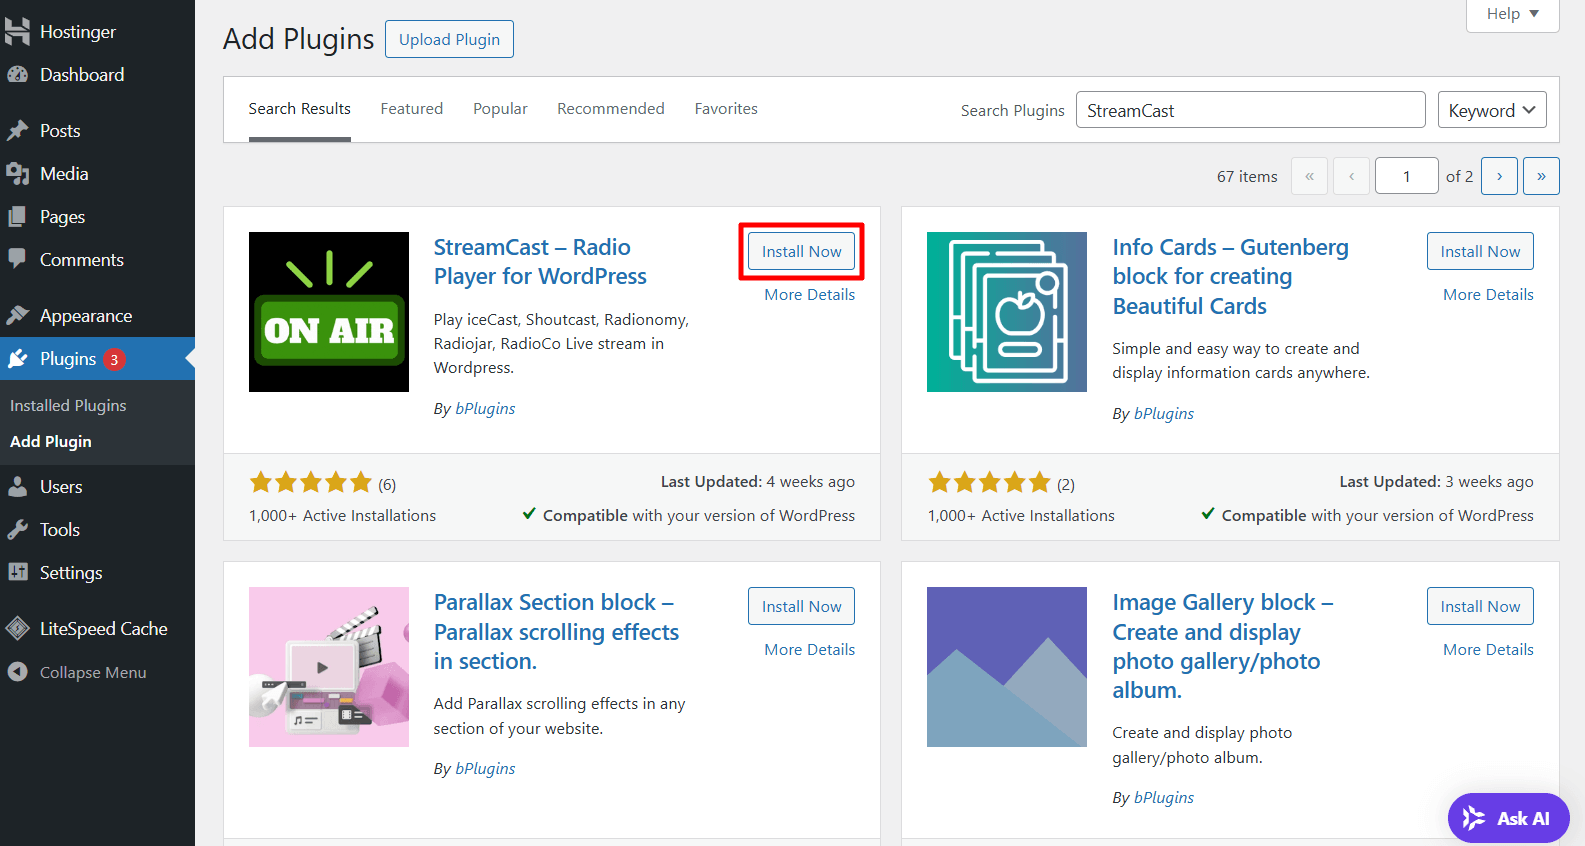
From your WordPress dashboard, go to Plugins → Add New, then type “StreamCast” into the search bar.
Once it appears in the results, click Install Now, and then Activate the plugin.
Note: If you’ve installed the pro version, you need the license key to activate the plugin.
Add New Radio Player
To create your first radio player, navigate to the StreamCast section in your WordPress dashboard and click on “Add New Radio Player.”
Start by giving your player a name or title. Then, select the appropriate Radio Player Type from the available options.
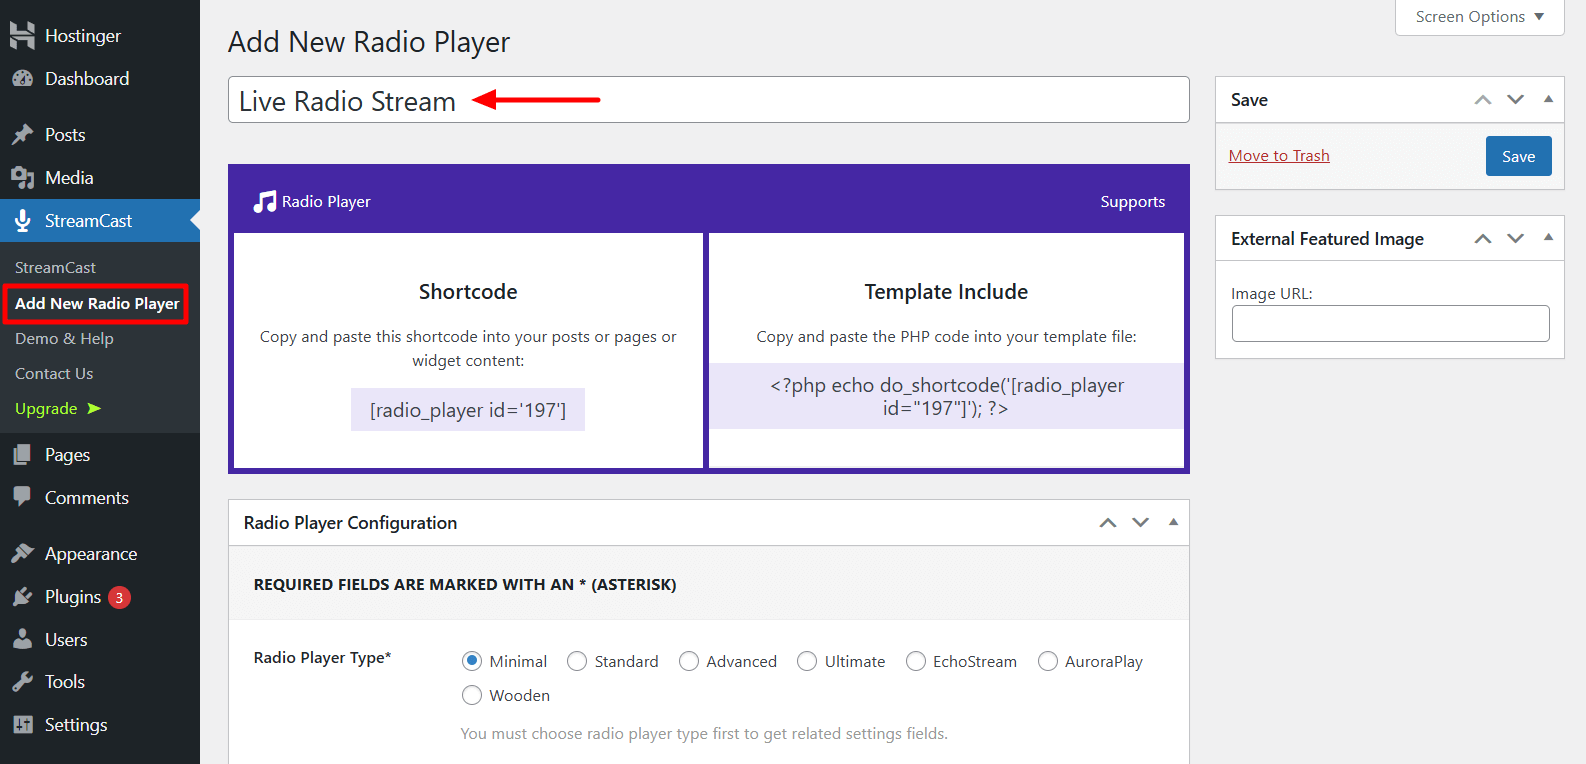
Note: Be sure to choose the player type first, as this will load the relevant settings fields specific to your stream format.
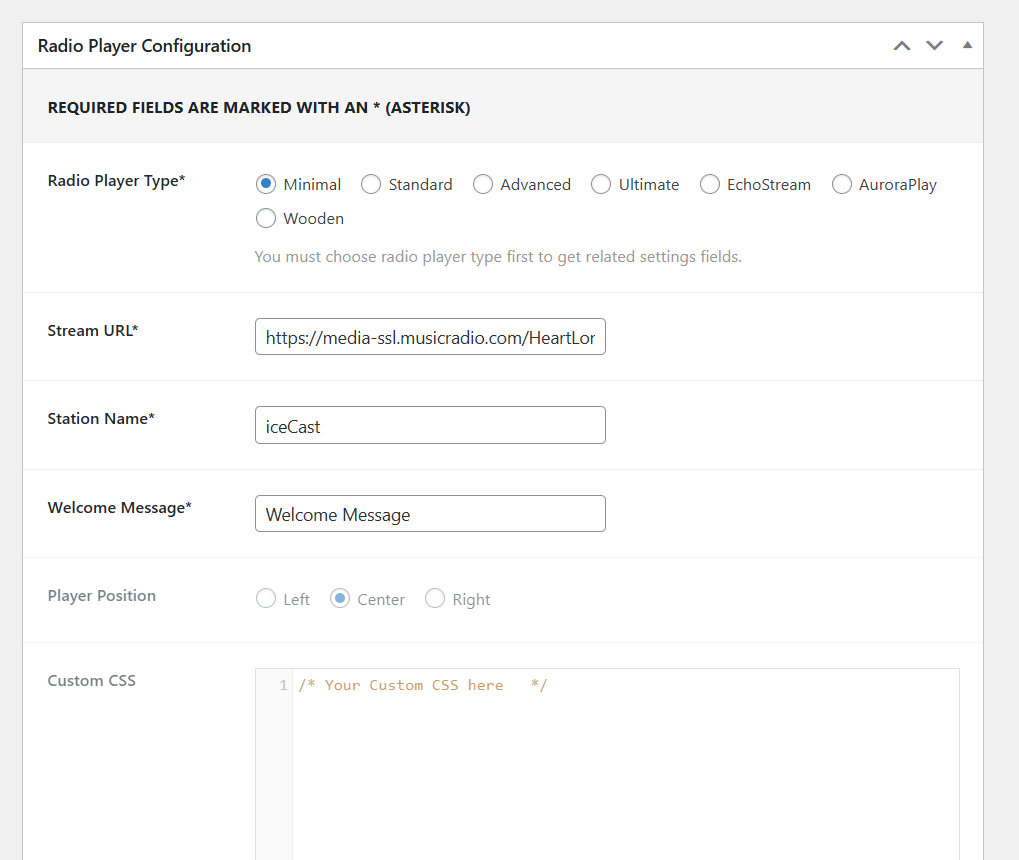
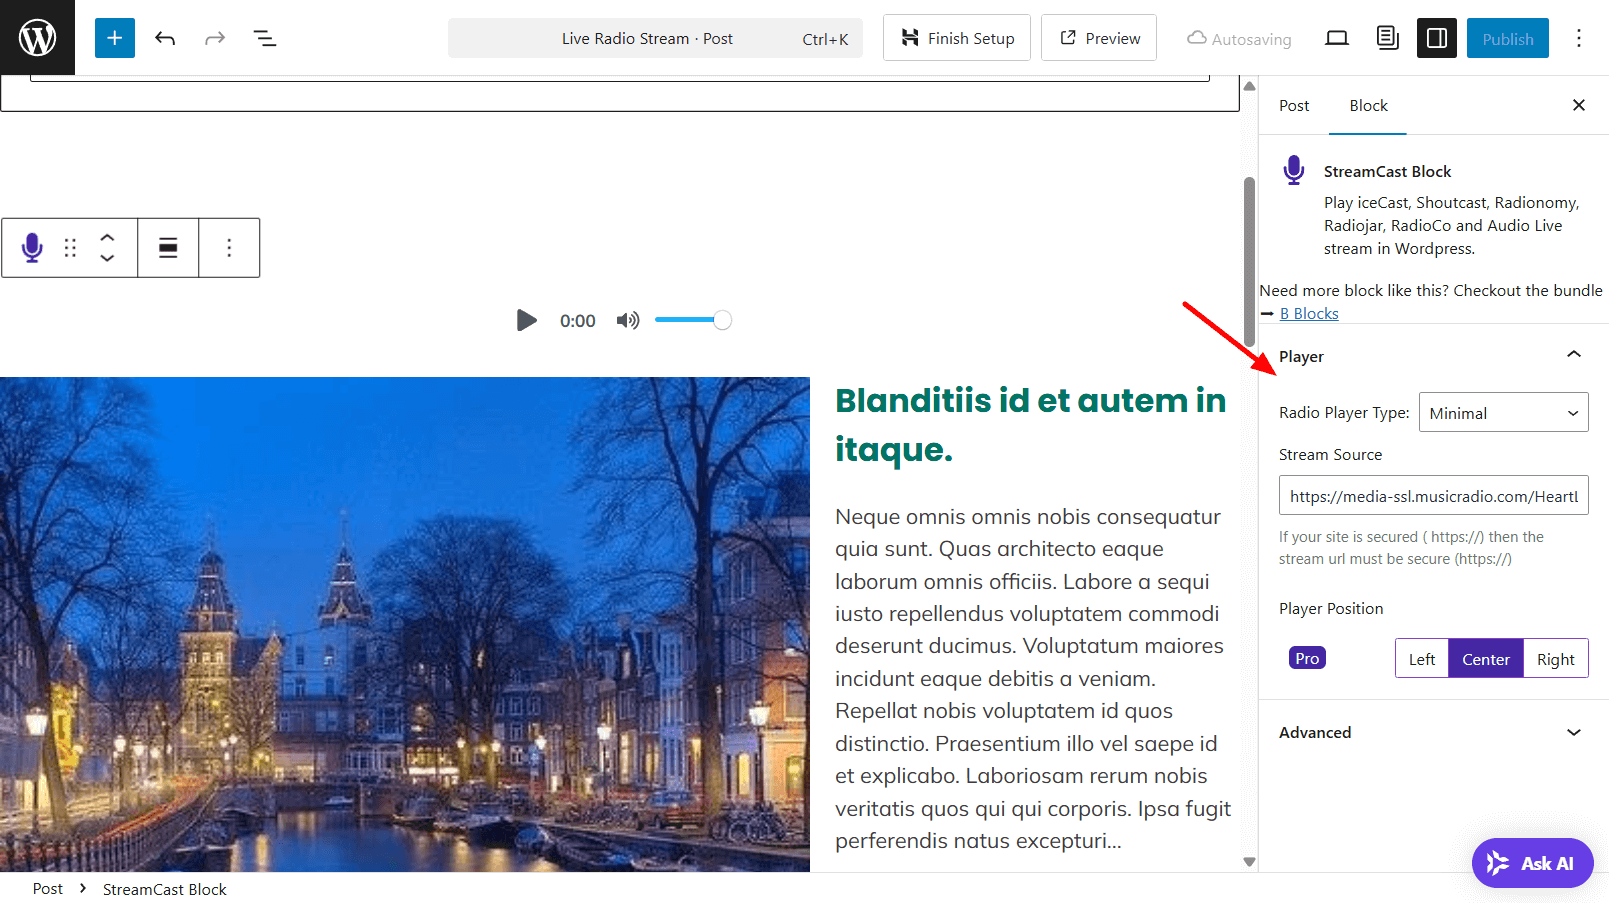
Next, enter your Stream URL, Station Name, and an optional Welcome Message. Once you’ve filled in the details, click Save to complete the configuration.
Add Live Radio Stream using Shortcode and Block
StreamCast offers two options for adding a live radio player to your WordPress posts or pages: a shortcode and a Gutenberg block.
Let’s go through both methods:
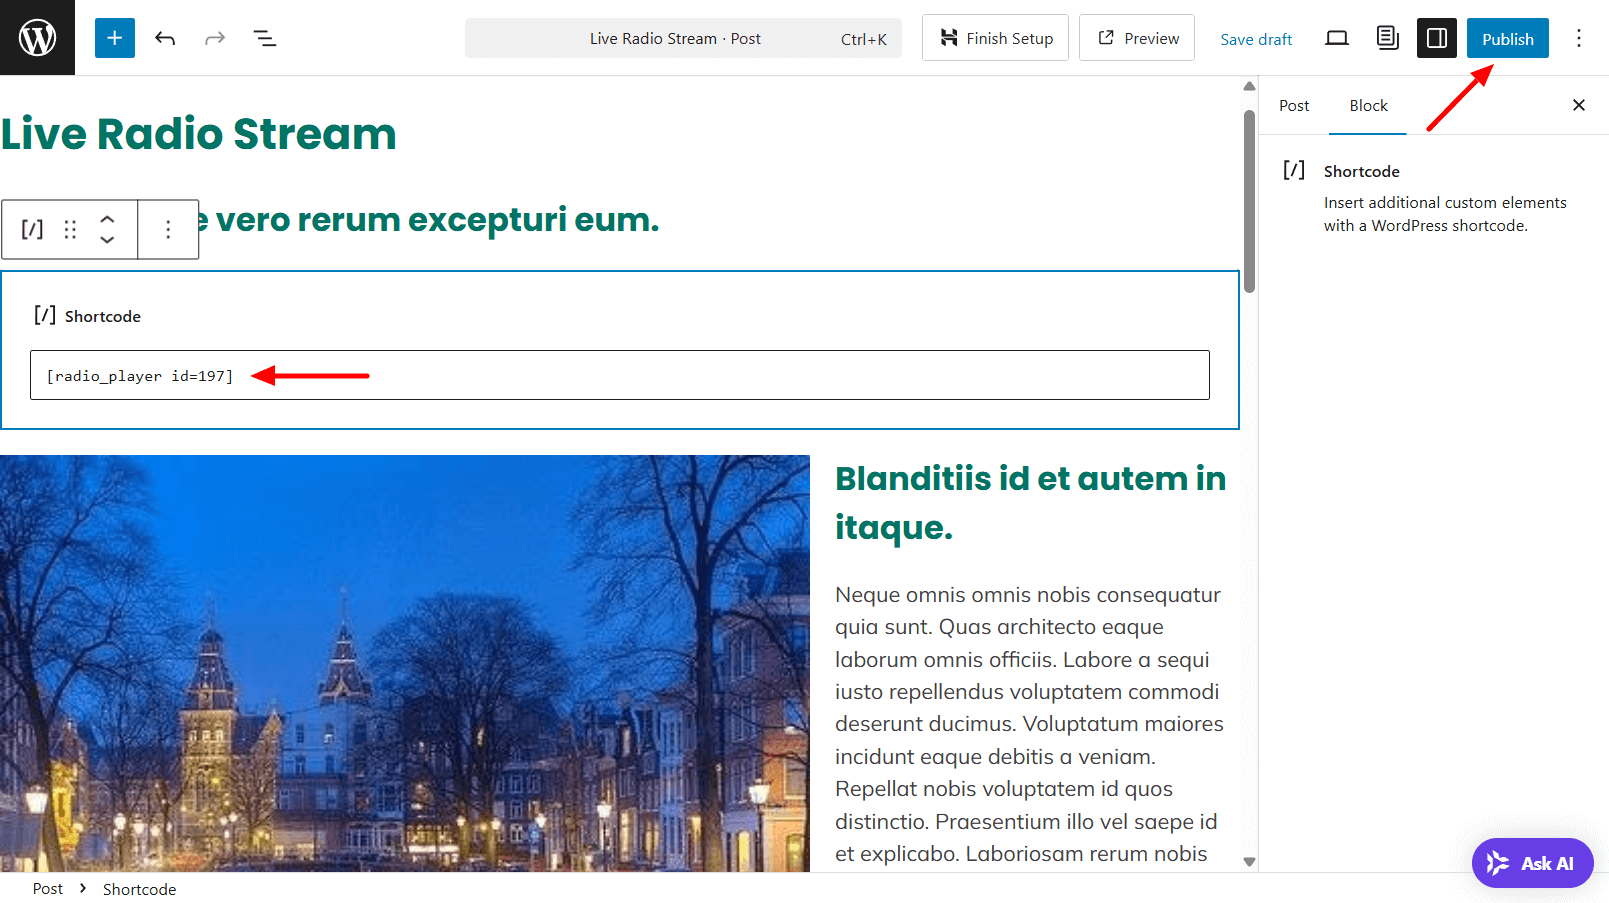
Go to the StreamCast menu in your dashboard and copy the shortcode of the player you created.

Open the post or page where you want to display the player.
Add a Shortcode block in the editor, paste the copied shortcode, and then click Publish or Update to apply the changes.
To use the Gutenberg block method, simply add the StreamCast block to your editor.
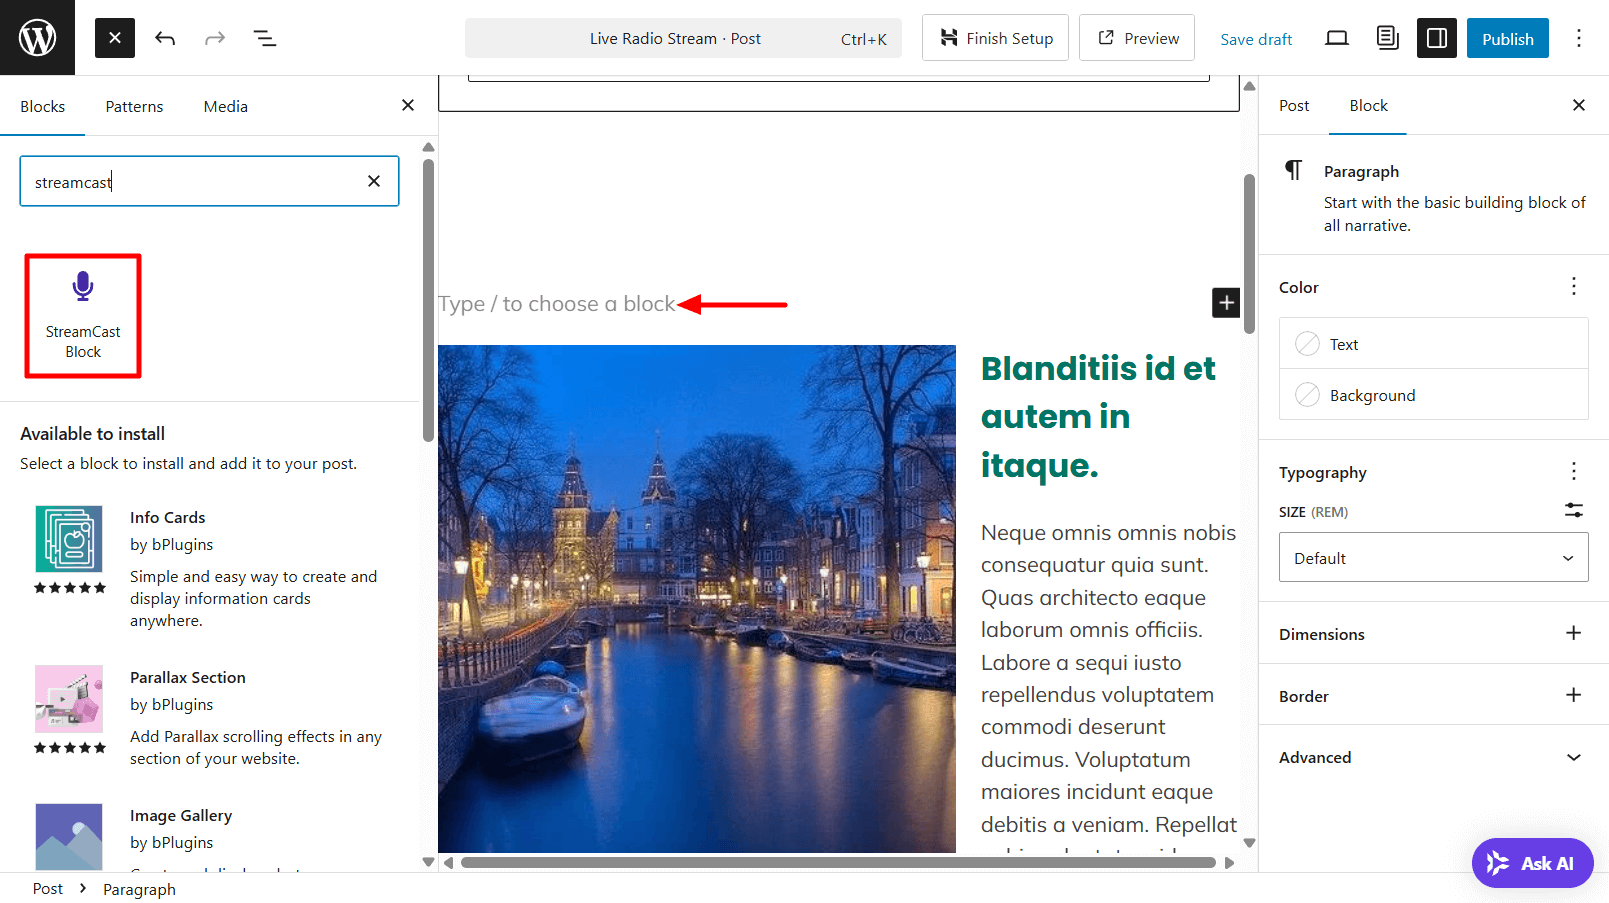
Then, use the block settings panel on the right sidebar to configure your radio player—such as selecting the player, setting styles, and customizing playback options.
Benefits of Using the StreamCast Plugin for Live Radio in WordPress
StreamCast is a simple, accessible, and fully customizable radio player plugin designed specifically for WordPress. Whether you’re broadcasting a live DJ set, church service, podcast, or a 24/7 internet radio station, StreamCast offers a reliable and user-friendly solution for embedding your live stream directly into your website.
Here are some of the key benefits:
80+ Built-in Skins: StreamCast includes over 80 unique player skins, allowing you to choose from a wide range of ready-made designs. Each skin offers a different layout and styling to match your brand or website aesthetic effortlessly.
Multiple Stream Type Support: StreamCast works with major radio streaming services, including Icecast, Shoutcast, Radionomy, Radiojar, and Radio.co—offering flexibility for broadcasters using different platforms.
Responsive Design: StreamCast is built to be fully responsive, ensuring your radio player looks and works great across all screen sizes—desktop, tablet, or mobile.
Fallback Support: If your stream becomes temporarily unavailable, the plugin can gracefully handle it—either by showing a fallback message or preserving layout integrity to maintain a clean user experience.
Autoplay Functionality: When supported by the user’s browser, StreamCast can automatically start playing the live stream. This helps create a seamless experience for returning visitors or in kiosk and embedded contexts.
Track Metadata Display: For supported streams, StreamCast can show real-time track metadata—such as current song title or artist name—boosting engagement and giving listeners useful context.
Gutenberg Block with Rich Controls: Use the dedicated StreamCast block to drag and drop players into the WordPress Block Editor with live customization options in the sidebar.
Easy Shortcode Integration: You can embed the radio player anywhere on your site using a simple shortcode like:
[radio_player id='197']This makes it easy to place players in posts, pages, sidebars, or any widget-ready area.
Advanced Styling Options: You can customize the player’s background, colors, and layout—right from the block settings or shortcode attributes—for a fully branded experience.
Optimized Mobile Player Display: Designed with mobile-first behavior in mind, StreamCast ensures controls and playback work flawlessly on smartphones and tablets.
Design & UX Tips for Your Radio Player
A successful live radio stream on WordPress isn’t just about getting the stream online—it’s also about delivering a seamless, enjoyable listening experience. The placement, functionality, and design of your radio player all play a role in keeping users engaged and tuned in longer.
Here are some proven design and UX strategies to consider:
1. Strategic Player Placement
Your radio player should be easy to find and always within reach. Depending on your site’s layout and user behavior, consider these placement options:
- Header bar – Makes the stream instantly accessible from any page
- Sidebar widget – Good for content-heavy sites like blogs or online magazines
- Sticky footer or floating bar – Keeps the stream playing as users scroll or browse
A persistent sticky player is often the best choice for uninterrupted listening.
2. Maintain Playback Across Page Navigation
One of the most frustrating issues for users is when the audio stops every time they click a new link.
To keep the live stream playing while navigating:
- Use a plugin or theme with Ajax-based navigation
- Try a pop-up player that opens in a separate browser window or tab
- Consider a single-page layout for your station homepage
- Use plugins that offer persistent playback across your WordPress site
This ensures continuous streaming without user disruption.
3. Show Current Track Info, Schedule, or Live DJ Details
Adding real-time information helps build trust and a connection with your listeners.
Look for players that support:
- “Now Playing” data from Icecast/Shoutcast
- Display of DJ names, track titles, and even album art
- Embedding a live schedule grid or upcoming show list
- Countdown timers to the next live show or DJ set
This also boosts the professional feel of your radio station and helps regular visitors tune in at the right time.
4. Ensure Mobile-Friendly Playback
Over half of web traffic comes from mobile users, so it’s essential that your WordPress radio stream works smoothly on phones and tablets.
Tips to improve mobile UX:
- Choose a responsive radio player plugin
- Avoid autoplay on mobile (browsers may block it)
- Keep player buttons large and tap-friendly
- Optimize stream bitrate for limited data connections
Testing across iOS and Android devices ensures your listeners won’t face playback issues.
5. Customize the Player to Match Your Branding
Your radio player should feel like a natural part of your site—not an awkward third-party widget.
Ways to brand your player:
- Adjust colors, fonts, and borders to match your theme
- Add your station logo or name inside the player
- Use consistent button styles for play/pause, volume, and track info
- Choose plugins that allow CSS customization or offer built-in themes
A well-branded player builds trust and enhances the overall aesthetic of your station.
6. Add Accessibility Features
Don’t forget accessibility. A good UX means everyone should be able to use your stream, including those with disabilities.
Consider:
- Making sure your player is keyboard navigable
- Using ARIA labels for screen readers
- Ensuring high contrast between buttons and backgrounds
- Avoiding flashing or overly animated designs
Plugins that follow accessibility standards will broaden your audience and improve usability for all.
Monetizing and Enhancing Your Live Radio Site
Running a live radio stream on WordPress can be more than just a passion project—it can become a self-sustaining, even profitable, digital broadcast platform. Whether you’re a hobbyist, a community broadcaster, or an online DJ, there are several ways to monetize your station and keep your audience actively engaged.
Here are powerful strategies to take your online radio site to the next level:
Embedding Ads or Sponsors
Advertising is a classic revenue model for radio, and you can replicate it on your WordPress site.
Ways to monetize with ads or sponsors:
- Static banner ads: Place sponsor logos or ads near your radio player, in sidebars, or within post content using ad management plugins like Ad Inserter.
- Audio sponsorships: Insert short audio ads (pre-roll, mid-roll, or post-roll) using radio automation software or audio editing tools.
- Sponsored segments: Offer brands the chance to sponsor specific shows or DJ sets in exchange for promotion.
- Affiliate links: Promote relevant products (e.g., DJ gear, music apps) and earn a commission through affiliate programs.
Be transparent with your audience and follow local disclosure regulations when using sponsored content.
Collecting Donations or Subscriptions
Many online radio stations rely on listener support to stay afloat, especially if they are ad-free or community-focused.
Ways to accept listener contributions:
- Use donation plugins like GiveWP or WP Simple Pay to accept one-time or recurring donations.
- Integrate PayPal or Stripe buttons directly into your homepage or player area.
- Offer subscriber-only content using a plugin like MemberPress, such as ad-free listening, early access to shows, or exclusive live sets.
- Set up Patreon and link it with your site to reward supporters with behind-the-scenes content, shoutouts, or merch discounts.
Promote your donation link clearly but respectfully—listeners are more likely to support you if they feel connected to your content.
Adding Chat, Request Forms, or Live Schedules
The more interactive your site is, the more likely visitors are to return and engage regularly.
Enhancement features to include:
- Live chat or shoutbox: Add real-time chat using tools like Tawk.to, LiveChat, or Telegram widgets, letting listeners engage with DJs or each other.
- Request a song: Use contact form plugins like WPForms, Fluent Forms, or Ninja Forms to let listeners submit song requests or dedications.
- Live schedule: Create a weekly or daily programming schedule using a table block or plugins like Timetable and Event Schedule by MotoPress.
- Countdown to next show: Use countdown timer plugins to build excitement for live events or guest DJ sets.
These features encourage real-time interaction and give your station a professional, community-driven feel.
Analytics and Listener Tracking
Understanding your audience is key to growing and monetizing your WordPress radio stream effectively.
Tools and metrics to track:
- Stream server analytics: Platforms like Icecast, Shoutcast, or Radio.co often provide built-in stats, including concurrent listeners, peak times, and listener locations.
- Google Analytics: Track pageviews, session duration, and referral sources for your radio pages. Use event tracking to monitor play button clicks.
- Matomo (an open-source GA alternative) offers privacy-focused, self-hosted analytics.
- Player-based stats: Some premium radio player plugins include built-in stats such as play count, average listening duration, and click-through rates.
Use this data to optimize your schedule, personalize content, and present metrics to potential advertisers or sponsors.
SEO Tips for Radio Streaming Sites
You’ve built your station and set up the stream—now it’s time to get discovered. SEO (Search Engine Optimization) helps your radio site appear in search results, attract new listeners, and build your brand’s online presence.
Here are some practical SEO strategies specifically tailored for radio streaming on WordPress:
Optimize Stream Pages for Discovery
Your “Listen Live” or homepage should be optimized like any other landing page.
Checklist for optimizing your stream page:
- Use a keyword-rich page title like: “Listen to [Station Name] – Live Internet Radio Stream”
- Include the target keyword “live radio stream WordPress” or “[your genre] online radio stream” in headings and body copy
- Add a compelling meta description that encourages clicks from Google
- Use ALT text on player images or artwork describing the genre (e.g., “electronic music stream player”)
- Embed show descriptions, DJ bios, and schedule information using H2/H3 subheadings for better readability and indexing
Also, link to your stream page from your site’s main navigation, homepage, and social media bios to improve internal and external visibility.
Use Schema Markup for Live Content
Structured data (schema) helps search engines better understand your content and increases the chance of rich results.
Recommended schema types:
- BroadcastEvent – Use for scheduled radio shows with times, host, and topic
- AudioObject – Describe your stream or podcast replays
- LiveStream (via VideoObject) – Even though your content is audio, this can work if paired with metadata or visual components
You can implement schema manually or use SEO plugins like Rank Math or Schema Pro, which include built-in support for structured data.
Embed Podcast Replays or On-Demand Recordings
Not everyone can tune in live, so offering replays or recordings increases your site’s value—and its SEO potential.
How to do it:
- Record your shows using your streaming software (e.g., Mixxx or SAM Broadcaster)
- Upload MP3s to your WordPress Media Library or podcast hosting platform
- Embed audio replays using plugins like HTML5 Audio Player, Seriously Simple Podcasting, or Fusebox Player
- Create an “On-Demand” or “Archives” section where users can listen anytime
Include episode titles, show notes, timestamps, and transcripts to enhance SEO and accessibility.
Improve Loading Speed for Audio and Player UI
Site speed is a ranking factor and essential for streaming UX. Audio streaming is lightweight compared to video, but still needs optimization.
Speed optimization tips:
- Use a lightweight radio player plugin that doesn’t bloat your page (avoid large JS libraries or excessive tracking)
- Host your audio stream on reliable, dedicated servers (avoid free or unstable hosts)
- Use caching plugins like WP Rocket, LiteSpeed Cache, or W3 Total Cache
- Defer non-essential scripts (e.g., animations or chat widgets)
- Enable lazy loading for content beneath the fold
Also, test your stream page using tools like Google PageSpeed Insights or GTmetrix, and fix any flagged performance issues.
FAQs on Setting Up a Live Radio Stream in WordPress
1. How do I stream live audio on WordPress?
To stream live audio on your WordPress site, you need:
- A streaming server (Shoutcast, Icecast, or a managed service like Radio.co)
- Broadcasting software (BUTT, Mixxx, SAM Broadcaster) to send your feed
- A WordPress radio player plugin (StreamCast, WP Radio, or Radio Player) where you paste your stream URL
Visitors will then be able to listen directly on your site.
2. Can I use Shoutcast with WordPress?
Yes. Shoutcast works seamlessly with the WordPress radio plugin StreamCast. Setup is easy: configure your stream server, broadcast with your tool of choice, copy the Shoutcast stream URL, and paste it into your player plugin.
3. How do I make a 24/7 internet radio station on my site?
Use an automated solution like Radio.co or Airtime Pro to schedule playlists and show blocks. Connect that stream to your WordPress player plugin, add a broadcast schedule, and optionally include analytics—letting you run your station continuously, even offline.
4. What’s the best plugin for live radio in WordPress?
It depends on your needs:
- Lightweight & responsive: StreamCast, Radio Player
- Comprehensive scheduling + streaming: Radio Station by netmix®
Look for features like Shoutcast/Icecast support, Now Playing metadata, mobile-friendliness, and sticky playback.
5. Can I stream live radio on WordPress without technical setup?
Yes! Managed platforms like Radio.co or Airtime Pro handle the streaming backend. You just need to grab the stream URL and embed it with a plugin—no server expertise required.
Conclusion
Getting your live radio stream running on WordPress is easier than you might think. With the right setup—a streaming server, broadcasting software, and a powerful player plugin like StreamCast—you can create a smooth, professional radio experience right on your website.
StreamCast makes it simple to embed your live stream, customize the player, and ensure it works flawlessly across all devices. Whether you’re broadcasting music, sermons, or talk shows, it gives you the control and flexibility you need—without the technical headaches.
Together, WordPress and StreamCast let you build more than just a radio player. With listener stats, donation tools, schedule integration, and SEO support, your site can grow into a full-featured broadcasting hub.
You’ve got the tools and the roadmap—now go live and let the world hear what you have to say.